In which we write our first simple machine code
What exactly is machine code?
In the previous post we explored the idea that numbers stored in a computer’s memory can represent different things. A byte at an address can hold 256 different values, which could be interpreted as an integer, or a character to be displayed, or the pixels that make up the character on screen.
We also edited some values in memory by hand to draw some simple graphics on screen.
Obviously we really want the computer to do that for us. We want to give it some instructions that it will follow to clear the screen, draw a level, animate characters and so on until we have a working game. How do we do that?
The answer comes in a new way to use those numbers stored in memory - to make them represent instructions. If you’ve used a high level
language, you’ll have seen text files that have ‘sorta English’ sounding commands like print and return. However, the processor at
the heart of even the most modern computer does not understand even that rather mangled version of English. It has a vastly more simple
view of the world. This is unique to each different design of microprocessor, and we refer to these ‘raw’ instructions as machine code - the
lowest level of instruction a computer can understand.
Machine code for a given microprocessor treats numbers stored in memory as instructions. When it runs, the processor acts like a simple clockwork toy - read a value from memory, perform the instruction that the value represents, read the next value and repeat. Some instructions need a little more information, so the CPU might read additional bytes. However, the first byte it reads will always tell it what to do next, whether that’s just performing an action or reading further data from memory.
In the case of the 65C02, when it reads a byte of value $EA it will do nothing (yes, there is an instruction to do nothing!). When it
reads a value of $C8 it will increment a counter by one. The 65C02 used in Cerberus has 70 unique instructions, and a number of different
addressing modes that tell it how to get or store data (don’t worry about them just now). We can look up the numbers (the machine code) in
the datasheet and write those values into Cerberus’ memory for the
processor to run.
A Very simple program
Let’s use the Cerberus emulator
to test a very short program. Make sure the address input is reading 0202, then enter the following sequence into the data input
8c,00,f8,c8,80,fa and click Set Data:

Now click Reset and then Run. If all is well, the character in the top left of Cerberus’ screen will be flickering rapidly.
What is happening? Well, the program is writing the value of a counter to the first address of screen memory, then incrementing the counter
and repeating the process. The counter counts from 0 to 255 and then repeats from 0 again. If you click Stop you can stop the
program. Clicking Step will step through it, one instruction at a time.. write the counter to screen, increment it, repeat the loop. Each
three clicks on Step should see the character on screen changing once. Write. Increment. Repeat. Clicking Run allows the processor
to run at full speed, and the character changes become a blur.
Congratulations, you’ve run your first machine code program.
It’s a bit confusing, isn’t it? Translating instructions into numbers and back again is difficult, can we make it easier?
In the early days of computers, this was all done by hand - a very slow, labourious and error prone task. It didn’t take long for someone
to realise that computers are very good at slow and laborious tasks, and that we could replace our sequence of incomprehensible numbers
with simple words (called mnemonics) and make the computer check them and translate them for us. Though the words appear a little weird
at first, they are easy to learn with a bit of practise and make it possible to read and write programs without memorising a large
table of numbers or diving for the datasheet. This is called Assembly language and an Assembler translates mnemonics into machine
code for us.
Assembly Language
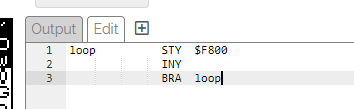
We can write our simple program above as assembly language:
loop          STY  $F800
              INY
              BRA  loop
OK, so at first glance it’s not much easier to understand than the bare numbers, but let’s break it down.
The first line has a label loop that helps us identify that part of the program later on. It then has an instruction STY that
tells the computer to STore Y (our simple counter) at address $F800. From the
previous post, you may remember that $F800 is the first character of our screen. When the 65C02 stores a value, it writes it to
memory.
The second line has an instruction INY that INcrements Y. When we increment a value, we add one to it. The Y counter can only
store one byte, so when it goes past 255, it resets to 0.
The third line tells the computer to BRAnch (that means go to) a particular label, called loop. In other words, it tells the
computer to repeat the program from our first instruction.
Though the language is very terse, and uses odd words, we can read what it does. Write a value to screen, increment that value and repeat.
To make it as easy as possible to create programs, the Cereberus Emulator includes an Assembler and a text editor. Look for the Edit tab in the editor
window, where you can copy and paste (or type!) the program above. It should look something like this:
If you enter the program, and click the Assemble button, what happens?
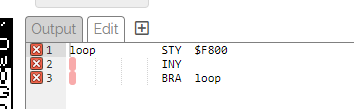
Those red crosses mean that something has gone wrong. Let’s fix it. If you hover over the markers in the editor, you should see a
message You must set the ORG (start) address before your code. This is telling us what the problem is. In fact, though our three instructions
are enough for the computer to run a simple program, the Assembler needs one more piece of information - where does the program go? When it
translates the instructions into machine code, it needs to know where to put the values in memory.
Cerberus is designed so that, once it has reset the processor, it will start executing instructions from address $0202. That’s why we
stored the raw machine code values at that address earlier on. Every time you click Reset, the 65C02 will start reading instructions
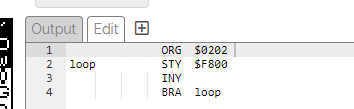
from that address. We need to tell the Assembler that our program is to start at that location. The ORG command does this job, so add a line
at the start of the program like this:
Now, clicking Assemble should complete successfully, and show the Output tab like this:
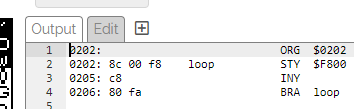
This is our program, but with some extra information added at the start of each line, showing how the Assembler has translated our instructions
into machine code. The first few digits before the colon show the (hexadecimal) address for the line. Immediately after the colon are any
bytes stored from that address onwards. We can see that the STY instruction is actually translated into three bytes 8C, 00, F8.
Conversely, the INY instruction takes up just one byte, C8. These numbers match the values we input manually earlier.
Debugging
Because we have used the Assembler to tell the Cerberus Emulator what our program ‘looks like’, it can help us when we run or debug the
software. With the Output tab visible in the editor, if you click Step, you will see that the current instruction that is being executed
in the program is highlighted. This allows us to track what our program is doing. The current line is not shown when we click Run (the
processor steps through the program too fast), but clicking Stop will show which instruction the computer is stopped on and about to
execute.
Now that we’re able to write a simple program, we can also look at the window to the left of the Cerberus screen, which shows us the internal
state of the processor. Whilst all processors read and write data to memory, they also have some internal storage that they use to execute
instructions. The 65C02 has only a handful of these registers, but they are key to performing maths, testing values and accessing memory.
Here is the window:
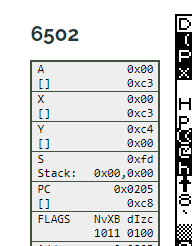
The first register is called A (for ‘accumulator’). It can store one byte and is used for all maths operations. If you want to add two numbers
together, you must put one into the A register, and then add the other number to it. We use the A register for moving data around, testing
values and maths.
The next two registers are called X and Y. These are also able to store a byte each, but cannot do many maths operations apart from being
incremented and decremented (adding and subtracting one). They are used to point to parts of memory to read or write data, and are referred to
as the index registers.
Then we have the S, Stack register. A stack is a simple data structure for storing and retrieving data in sequence and is used by the 65C02
for a number of purposes that we’ll discover later.
Finally, there is the PC register, the program counter. Unlike the other registers, this is a two byte value (16 bits) and stores the address
of the instruction that the processor is about to execute.
For each register, two values are shown. The top one is the value stored in the register itself. Below it is the value stored at the memory
location that value points to. So if a register has a value of $E3 the top number will read E3 and the bottom will show the contents of memory
address 00E3.
Below the PC register are shown the Flags. These are used to check the output of any calculations.
Now, when we click Step we can see how the registers change. Note that the PC register counts through the addresses that we stored our
program at. Notice also how the Y register increments each time we step over the INY instruction. If you Step through enough times you
will also see the N and Z flags change from time to time. In fact these are showing whether the result of the INY instruction was Zero
or Negative. Flags are very useful for making decisions in our programs, and we’ll learn to use them in the next post.
Recap
In this post, we’ve learned about machine code, and how a microprocessor treats the numbers in memory as instructions to execute. We’ve also introduced assembly language, a more human readable way of writing machine code programs. We can use the Cerberus Emulator to assemble and run programs, and to debug them by stepping through them and examining the internal state of the microprocessor.
That’s quite a big step.
In the next post, we’ll put all of this together to write our first simple routines, and begin building out the core components of our game.